X2Go provides graphical access to the e-beam server, much like VNC but with fewer bugs.
Skip ahead to the file transfer instructions
Do you have that x2go login problem? Click here.
Ready to give up on x2go? Try WSL instead.
0. Contact YINQE staff to set up your account on the e-beam server, then set your password using a terminal or command window. Log in with the command "ssh your.name@sizzlorr.eng.yale.edu". You will be prompted to change your password when you log in the first time. (The new ebpg 5200 has a new companion server named freebeam.eng.yale.edu. You might substitute "freebeam" for "sizzlorr" in these instructions.)
1. Download and install the x2go client for your computer.
The download menu is ugly but don't let that frighten you.
If you are presented with an "Index of /releases/binary-...."
then just choose the first one.
2. Find that file in your "Downloads" or whatever directory, click on it, and install the x2go client using all the default choices.
3. Now you should have a X2Go icon on the desktop
.png)
Here is a more fun icon you could use instead of the default.  Right click on the default icon, then choose Properties --> Shortcut --> Change Icon
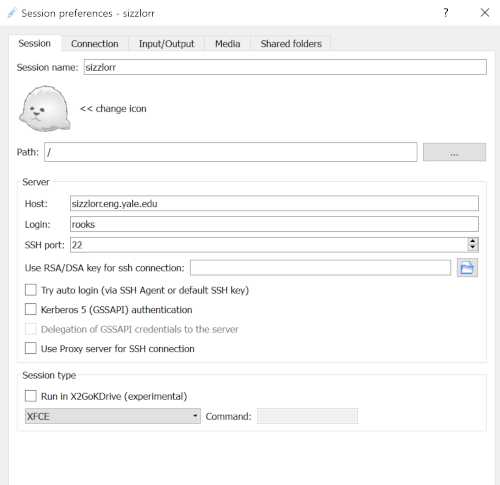
4. Create a new "session" and fill out the first tab like this:
For the session type choose XFCE. This is important.
Host: sizzlorr.eng.yale.edu
Login: your.name is your login name on sizzlorr
SSH Port: 22
Session type: XFCE THIS IS IMPORTANT - GNOME DOES NOT WORK
5. Fill out the "Input/Output" tab like this:
.png)
Fullscreen is probably what you want.
DPI = 100 makes the fonts look normal. Larger DPI values make the fonts too large. Or you can try unchecking the DPI setting, as shown above. Sometimes that works.
.
OFTEN you must fuss around and experiment with these Input/Output resolution settings to find values that work. I sure did! My setup has a 3840x2160 pixel monitor as screen #2. Using "fullscreen" in x2go did not allow me to move the cursor to the other screen. After some experimentation, I found this would work well:
.
.png) .
.
If the resolution is set to less than the monitor's resolution, then the "maximize" button can be used, and the cursor can still slide from one monitor to the other.
.
Some new laptops come with ridiculously high resolution (eg 3840x2400) and then Windows can be set to throw it away by scaling by, say, 300%. X2go is not cool about this. It's very buggy, so it's hard to find a setup that works. This setup might work for you: Use a display scaling of 200%, then set the x2go resolution to 2000x1000. After the x2go window starts (it might take several minutes) then you can use the 'maximize' button to fill the screen.
6. Media tab: Turn off pulse audio. It just causes problems.
7. Click on the box in the upper-right of the x2go client:
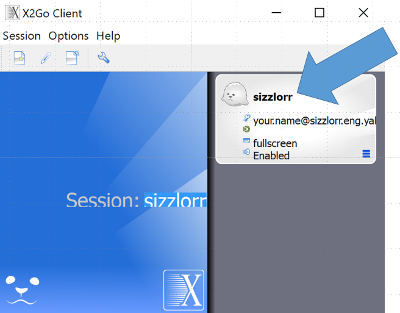
Enter your user.name and password.
It will take about ten seconds to start the session. If nothing happens for a while, you can exit full-screen mode (on Windows) with ctrl-alt-tab.
8. When you are done, use the Linux menu System → Logout. If you simply close the x2go window without logging out, that works fine also -- if you log back in with the same computer. If you switch computers or screens then x2go will get very confused about the screen resolution.
Handy tip
Sometimes you need to reset x2go on the sizzlorr side. To do that, log in with a terminal window, with a command like
ssh -Y your.name@sizzlorr.eng.yale.edu
Then open up a linux terminal window and use the command
zap x2go
Another handy tip
Disable any screen saver or power saver function on your computer. If your computer goes into 'sleep' mode then x2go will hang. If it hangs then refer to the previous handy tip.
9. Create a link to your local disk for file transfers from Windows or Mac
Ready for more excitement? You can use x2go to create a link (or "mount point") from sizzlorr to your PC. Click on the "session actions" button:
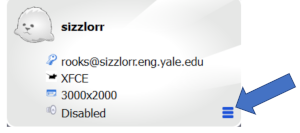
and then choose "session preferences"
Go to the "Shared folders" tab, and click on the folder icon to choose a local folder. For example, you could choose your "Documents" folder, and then click on "Add".

After you click on "Add," be sure to choose "Automount." Otherwise the file link will not work at all. Why is this even an option?
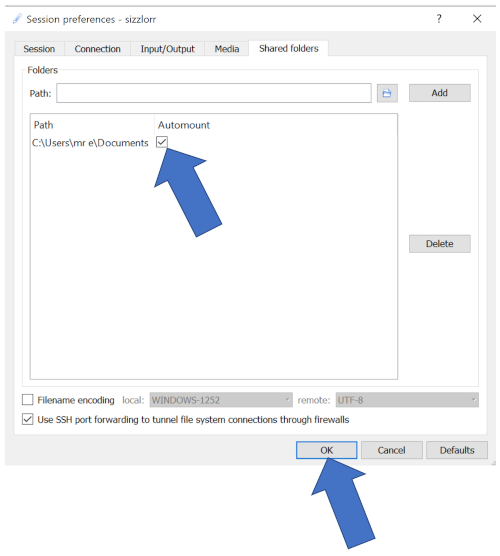
You might have to wiggle the menu box around to see the "OK" button at the bottom. Click on OK of course.
From the x2go view of sizzlorr, you should open the "Home" folder and find the folder "media" in your home directory:
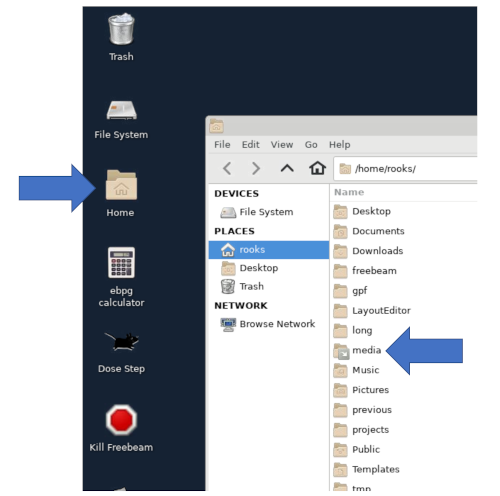
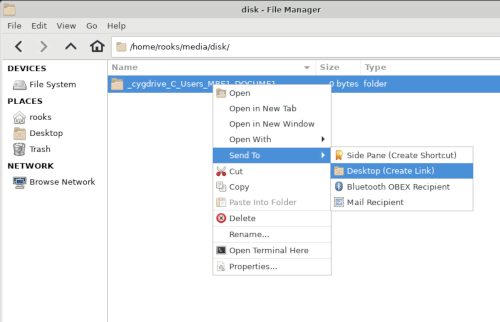
Open "media" then "disk" then "_cygdrive_C_....bla...bla" to find your local files. To be extra cool, go back up to the "disk" folder, and make a shortcut. Just to be a pain, linux does not call it a "shortcut." Right-click on the folder, then choose "Send To" and "Desktop":
If this does not work for you, there are many other ways to transfer files. You could use box.yale.edu or Google drive to transfer files in two steps. You could use "scp" from a terminal window, if you like to do things old-school.